
.jpg)
Wednesday, May 30, 2007
.jpg)
Eco Toys
Source: Jenny (Birthday Gift, 2005)
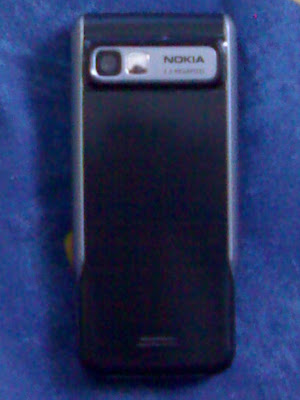
Model: Nokia 3230

The head was moving like saying 'YES' x 3 to you.
Model: Nokia 3230

The head was moving like saying 'YES' x 3 to you.
Acronis True Image 10.0 - Recover the entire hard drive contents
Prerequisite:
Step by Step:
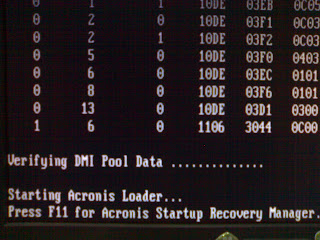
Power on computer and when you see:
Starting Acronis Loader...
Press F11 for Acronis Startup Recovery Manager
Press F11 (Function Key)
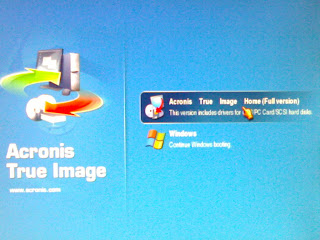
On the Main Acronis Login screen, please select Acronis True Image Home (Full version)
Acronis True Image Home allow you to set password to security purposes.
Key in necessary password.

Acronis
Loading, please wait...
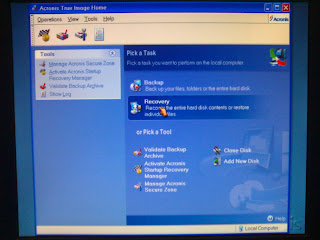
Acronis True Image Home Main Menu
Please select Recovery
Recovery: recover the entire hard disk contents or restore individual files.
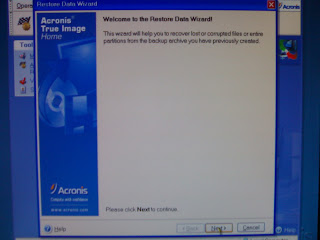 Welcome to the Restore Data Wizard!
This wizard will help you to recover lost or corrupted files or entire partitions from the backup archive you have previously created.
Please click Next to continue.
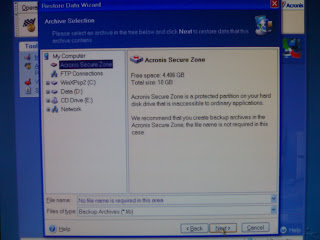
Archive Selection:
Please select 'Acronis Secure Zone' in the tree and click Next to restore data that this archive contains.
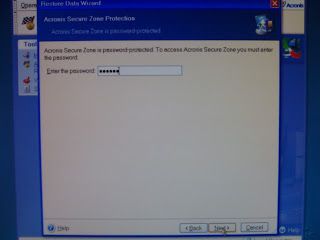
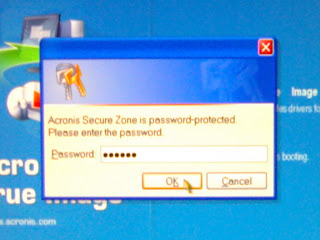
Acronis Secure Zone Protection:
Acronis Secure Zone is password-protected
Please enter the password and click Next to continue.
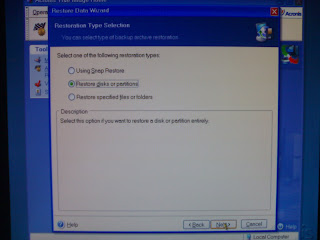 Restoration Type Selection: You can select type of backup archive restoration.
Choose 'Restore disks or partitions'
Descriptions: Select this option if you want to restore a disk or partition entirely.
Please click Next to continue.
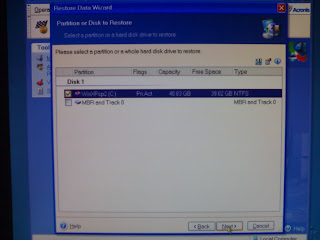
Partition or Disk to Restore:
Select a partition or a hard disk drive to restore
Please select/tick the 'Disk 1; (C:) drive partition; Flags: Pri Act' as shown in the picture
Please click Next to continue.
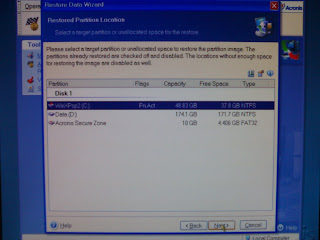 Restored Partition Location: Select a target partitions or unallocated space for the restore
Please select 'Disk 1; (C:) drive partition; Flags: Pri Act' as shown in the picture
Please click Next to continue.
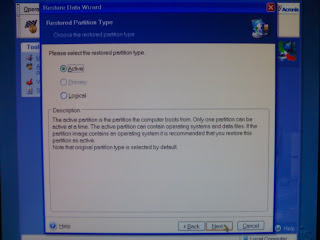 Restored Partition Type:
Choose the restore partition type
Please select 'Active'
Note that original partition type is selected by default.
Please click Next to continue.
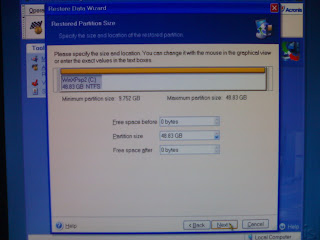
Restored Partition Size:
Specify the size and location of the restored partition
Leave default setting
Please click Next to continue.
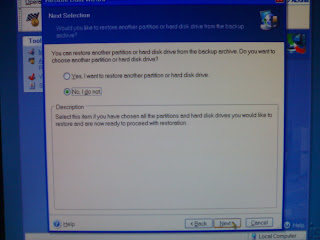
Next Selection:
Would you like to restore another partition or hard disk drive from the backup archive?
Please select 'No, I do not' and click Next to continue.
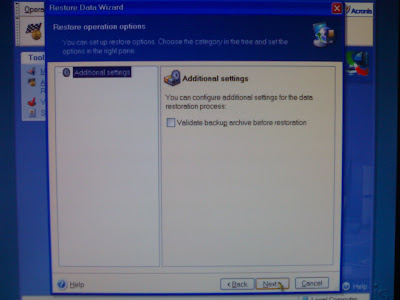 Restore operations options:
You can set up restore options. Choose the category in the tree and set the options in the right pane.
Leave default setting
Please click Next to continue.
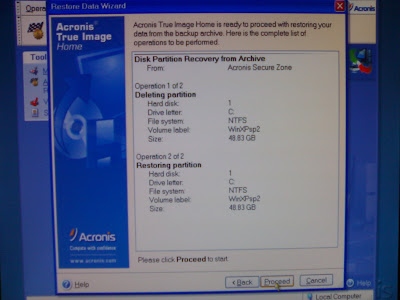
Acronis True Image is ready to proceed with restoring your data from the backup archive. Here is the complete list of operations to be performed.
Please click Proceed to start.
- Acronis True Image 10.0 installed on the system
- Activated Acronis Startup Recovery Manager
- Created a new full backup archive from first time Windows installation
- Backup all necessary data on (C:) drive to other partitions or external drive
Step by Step:

Power on computer and when you see:
Starting Acronis Loader...
Press F11 for Acronis Startup Recovery Manager
Press F11 (Function Key)

On the Main Acronis Login screen, please select Acronis True Image Home (Full version)

Acronis True Image Home allow you to set password to security purposes.
Key in necessary password.

Acronis
Loading, please wait...

Acronis True Image Home Main Menu
Please select Recovery
Recovery: recover the entire hard disk contents or restore individual files.
 Welcome to the Restore Data Wizard!
This wizard will help you to recover lost or corrupted files or entire partitions from the backup archive you have previously created.
Please click Next to continue.

Archive Selection:
Please select 'Acronis Secure Zone' in the tree and click Next to restore data that this archive contains.

Acronis Secure Zone Protection:
Acronis Secure Zone is password-protected
Please enter the password and click Next to continue.
 Restoration Type Selection: You can select type of backup archive restoration.
Choose 'Restore disks or partitions'
Descriptions: Select this option if you want to restore a disk or partition entirely.
Please click Next to continue.

Partition or Disk to Restore:
Select a partition or a hard disk drive to restore
Please select/tick the 'Disk 1; (C:) drive partition; Flags: Pri Act' as shown in the picture
Please click Next to continue.
 Restored Partition Location: Select a target partitions or unallocated space for the restore
Please select 'Disk 1; (C:) drive partition; Flags: Pri Act' as shown in the picture
Please click Next to continue.
 Restored Partition Type:
Choose the restore partition type
Please select 'Active'
Note that original partition type is selected by default.
Please click Next to continue.

Restored Partition Size:
Specify the size and location of the restored partition
Leave default setting
Please click Next to continue.

Next Selection:
Would you like to restore another partition or hard disk drive from the backup archive?
Please select 'No, I do not' and click Next to continue.
 Restore operations options:
You can set up restore options. Choose the category in the tree and set the options in the right pane.
Leave default setting
Please click Next to continue.

Acronis True Image is ready to proceed with restoring your data from the backup archive. Here is the complete list of operations to be performed.
Please click Proceed to start.
Tuesday, May 29, 2007
Hotlink - WAP, GPRS, MMS & 3G Settings
Source: www.hotlink.com.my
Model: Nokia 3230

How to activate GPRS:
Setup your phone for GPRS:
Setup your phone for GPRS Web browsing:
Setup your phone for MMS:
Setup your phone for MMS Messaging:
===========================================================================
Note: Once upgraded to 3G services your WAP GPRS setting and MMS setting no longer usable. Please change the following:
How to activate 3G:
Setup your phone for 3G WAP:
Setup your phone for 3G Web browsing:
Setup your phone for 3G MMS:
Setup your phone for 3G MMS Messaging:
Model: Nokia 3230


How to activate GPRS:
- Key in *133# and press 'SEND/CALL' button.
- You will receive 2 messages confirming your activation
Setup your phone for GPRS:
- Press Menu > Settings > Connection > Access Points >
- Press Options > New Access Point > Use default settings >
- Connection name: Maxis WAP GPRS
- Data bearer: GPRS
- Access point name: net
- User name: maxis
- Prompt password: No
- Password: wap
- Authentication: Normal
- Hompage: http://wap.maxis.com.my/wml/index.wml
- Press Options > Advanced settings
- Phone IP address: Automatic
- Primary name server: 0.0.0.0
- Second name server: 0.0.0.0
- Proxy serv address: 202.075.133.049
- Proxy port number: 80
- Press Back (4 times)
Setup your phone for GPRS Web browsing:
- Press Menu > Web
- Press Options > Settings
- Default access point: Maxis WAP GPRS
- Press Back (2 times)
- Run browser and test connection
Setup your phone for MMS:
- Press Menu > Settings > Connection > Access Points >
- Press Options > New Access Point > Use existing settings >
- Use conn settings: Maxis WAP GPRS
- Connection name: Maxis MMS
- Data bearer: GPRS
- Access point name: net
- User name: maxis
- Prompt password: No
- Password: wap
- Authentication: Normal
- Hompage: http://172.16.74.100:10021\mmsc
- Press Options > Advanced settings
- Phone IP address: Automatic
- Primary name server: 0.0.0.0
- Second name server: 0.0.0.0
- Proxy serv address: 202.075.133.049
- Proxy port number: 80
- Press Back (4 times)
Setup your phone for MMS Messaging:
- Press Menu > Messaging
- Press Options > Settings > Multimedia message
- Access point in use: Maxis MMS
- Press Back (2 times) > Exit (2 times)
===========================================================================
Note: Once upgraded to 3G services your WAP GPRS setting and MMS setting no longer usable. Please change the following:
- Connection name: 3G WAP (Previously; WAP GPRS)
- Connection name: 3G MMS (Previously; MMS)
- Access point name: unet (Previously; net)
- Other settings remain unchanged
How to activate 3G:
- Key in *136# and press 'SEND/CALL' button.
- You will receive 2 messages confirming your activation
- De-activate 3G, key in *136*4# and press 'SEND/CALL' button.
Setup your phone for 3G WAP:
- Press Menu > Settings > Connection > Access Points >
- Press Options > New Access Point > Use existing settings >
- Use conn settings: Maxis WAP GPRS
- Connection name: Maxis 3G WAP
- Data bearer: GPRS
- Access point name: unet
- User name: maxis
- Prompt password: No
- Password: wap
- Authentication: Normal
- Hompage: http://wap.maxis.com.my/wml/index.wml
- Press Options > Advanced settings
- Phone IP address: Automatic
- Primary name server: 0.0.0.0
- Second name server: 0.0.0.0
- Proxy serv address: 202.075.133.049
- Proxy port number: 80
- Press Back (4 times)
Setup your phone for 3G Web browsing:
- Press Menu > Web
- Press Options > Settings
- Default access point: Maxis 3G WAP
- Press Back (2 times)
- Run browser and test connection
Setup your phone for 3G MMS:
- Press Menu > Settings > Connection > Access Points >
- Press Options > New Access Point > Use existing settings >
- Use conn settings: Maxis MMS
- Connection name: Maxis 3G MMS
- Data bearer: GPRS
- Access point name: unet
- User name: maxis
- Prompt password: No
- Password: wap
- Authentication: Normal
- Hompage: http://172.16.74.100:10021\mmsc
- Press Options > Advanced settings
- Phone IP address: Automatic
- Primary name server: 0.0.0.0
- Second name server: 0.0.0.0
- Proxy serv address: 202.075.133.049
- Proxy port number: 80
- Press Back (4 times)
Setup your phone for 3G MMS Messaging:
- Press Menu > Messaging
- Press Options > Settings > Multimedia message
- Access point in use: Maxis 3G MMS
- Press Back (2 times) > Exit (2 times)
Monday, May 28, 2007
Slow Network Printing from MS-DOS-Based Programs
Source: Microsoft.com
Article ID: 140036
Article ID: 140036
SYMPTOMS
When you print from an MS-DOS-based program, it may take from 60 to 90 seconds before printing begins, causing the program to pause. Quitting the program causes printing to begin immediately.
CAUSE
This problem can occur if the MS-DOS-based program does not close the printer port. By default, Windows 95 waits 45 seconds after the program stops sending information before printing the document.
RESOLUTION
To resolve this issue, add the following lines to the appropriate sections of the System.ini file, and then restart your computer:
These settings are in seconds. The lower the value you use, the sooner the document is printed. If you do not receive any printout, or documents are printed over multiple pages, the settings may be too low. Increase the settings until documents are printed correctly.
  [Network]
PrintBufTime=10

[IFSMGR]
PrintBufTime=10
NOTE: If the [Network] or [IFSMGR] sections do not exist in the System.ini file, add the sections after the [386Enh] section of the file.These settings are in seconds. The lower the value you use, the sooner the document is printed. If you do not receive any printout, or documents are printed over multiple pages, the settings may be too low. Increase the settings until documents are printed correctly.
APPLIES TO
| • | Microsoft Windows 95 |
| • | Microsoft Windows 98 Standard Edition |
"The address list could not be displayed" error message when you use your Contacts to address a new message in Outlook
Source: Microsoft.com
Article ID: 319901
Article ID: 319901
SYMPTOMS
If you attempt to address a new message from your Contacts, you may receive the following error message: The address list could not be displayed. The Contacts folder associated with this address list could not be opened; it may have been moved or deleted, or you do not have permissions. For information on how to remove this folder from the Outlook Address Book, see Microsoft Outlook Help.
CAUSE
This behavior can occur if the Microsoft Outlook Address Book is damaged.RESOLUTION
To resolve this issue, remove and reinstall the Outlook Address Book. To do this:| 1. | Start Outlook. |
| 2. | On the Tools menu, click E-mail Accounts. |
| 3. | Click View or change existing directories or address books, and then click Next. |
| 4. | Click Outlook Address Book, and then click Remove. |
| 5. | Click Yes when you receive the prompt to confirm the removal. |
| 6. | Click Add. |
| 7. | Click Additional Address Books, and then click Next. |
| 8. | Click Outlook Address Book, and then click Next. |
| 9. | Click OK when you receive the message to restart Outlook. |
| 10. | Click Finish. |
| 11. | Click Exit on the File menu to quit Outlook. |
| 12. | Restart Outlook. |
| 13. | In the Folder list, right-click the folder that you want to use with the Address Book (for example, right-click Contacts), and then click Properties. |
| 14. | Click the Outlook Address Book tab. |
| 15. | Click to select the Show this folder as an e-mail Address Book check box (if it is not already selected), and then click OK. |
APPLIES TO
| • | Microsoft Office Outlook 2003 |
| • | Microsoft Outlook 2002 Standard Edition |
Sunday, May 27, 2007
Mountain Climbing Certificate


Mount Kinabalu [12/05/2007-6:00am]
Location: Mount Kinabalu, Sabah
Camera: Canon IXUS 65
Time: 6:02:48am

Time: 6:06:44am

Time: 6:07:00am

Time: 6:07:08am

Time: 6:08:46am

Time: 6:44:44am

Time: 6:44:50am

Time: 6:45:04am

Time: 6:46:06am

Time: 6:46:58am

Time: 6:48:58am

Time: 6:55:24am

Time: 6:55:30am

Time: 7:20:12am

Time: 7:27:40am

Time: 7:36:20am

Time: 7:38:40am

Time: 8:03:06am

Time: 8:07:52am

Time: 8:08:06am

.jpg)
.jpg)
.jpg)
Saturday, May 26, 2007
D-Link KVM-121 (2-Port PS/2 KVM Switch with Audio Support)

Product Features:
| • | Control Two Computers Using a Single Monitor, PS/2 Keyboard, and PS/2 Mouse |
| • | Listen to Music From One Computer While Working on Another |
| • | No Drivers to Install and Nothing to Configure |

HP Compaq nx6320
- Processor Type: Intel Core 2 Duo Processor T5600* (1.83-Ghz, 667-Mhz FSB, 2-MB L2 cache)


- Memory: 1024MB, (512MB 667-Mhz DDR2 SDRAM x 2 pcs - Dual Channel)
- Hard Disk Drive: 120-GB Smart Sata Hard Disk
- Display/Resolution: 15" TFT XGA Display
- Graphic Chipset: Intel Graphics Media Accelerator 950 with up to 128MB shared system memory
- Optical Drive: DVD+/-RW Dual Layer Drive
- Bluetooth: Yes
- Wireless: 802.11 a/b/g
- Operating System: Microsoft Windows Vista Business (Downgraded to Windows XP Pro)
- Security Features: Fingerprint reader and HP ProtectTools
- PCMCIA support: One Type I/II
- Fax/Modem speeds: High Speed 56K V.92 modem with digital line guard
- Network Interface: Broadcom 10/100 Ethernet PCI controller
- Pointing Device Type: Touchpad with scroll zone, two soft-touch pick buttons
- Ports: PC Card Slot (One Type I/II), Express Card, External Monitor VGA x 1, IEEE 1394a Ports x 1, External Microphone x 1, Headphone/Line out x 1, Power Connector x 1, RJ-11 (Modem) x1, RJ-45 (NIC) x 1, Serial Port x 1, S-Video TV out x 1, Parallel Port x 1, USB 2.0 x 4, Extended Life Battery Connector x 1, Docking Connector x 1
- Media Card: Support SD, MMC, Memory Stick, Memory Stick Pro, Memory Stick Duo (Memory Stick Duo Adapter Required), Smart Media, xD-Picture card
- Battery Type/Battery Life: 6-cell Lithium-Ion (4.4Ah) - provides up to 4 hours and 45 minutes of battery life
- Dimension (WxDxH): 12.9 x 10.8 x 1.2 inches
- Weight: starting from with 15" display - 2.77kg
- Warranty: One Year International World Wide Warranty (parts/labor/carry-in)
- Bundle: Free HP Nylon Carrying Case
- Remarks: Cousin (Yee)
Friday, May 25, 2007
Neolith Clone PC
- Processor: AMD Athlon 64 X2 3800+ Dual Core Processor (2.0GHz, 1MB, 1GHz Bus, Socket AM2)
.jpg)
- Motherboard: Foxconn MCP61SM2MA-ERS2H
- Hard disk: Hitachi 250GB 7200RPM 8MB Serial ATA HDD
- Memory: Kingston 1GB 240-Pin DDR2 SDRAM DDR2 667 (PC2 5300)
- Casing: Neolith ATX Casing
- Optical Drive: Samsung DVDRW burner, SH-S182M, 18x,Dual, LightScribe, DVDRAM
- Printer: HP Deskjet F380 All-in-One Printer/Scanner/Copier
.jpg)

- Ink: HP 21 (Black), HP 22 (Tri-Color) & HP 58 (Photo)
- Remarks: Tai Yee
Subscribe to:
Posts (Atom)


